I'd like to say a HUGE THANK YOU to Nicole, for re-sending my Sweet Stamp Shop order after it disappeared somewhere over the Pacific!!! I sincerely appreciate your generosity Nicole, and I can't tell you how long I've been itching to play with these little beauties! And just in case there have been any Sweet Stamp Shop goodies you have a hankering for, Nicole has an AMAZING SALE on right now - but you'd better be quick :)
Saturday, November 23, 2013
Freshly Made Sweets with Gratitude...
Labels:
Colour Q,
Freshly Made,
Sweet Stamp Shop,
Thank-you Card,
Washi Tape
Thursday, November 21, 2013
Win a Birthday KIS...
Another quick birthday card featuring The Alley Ways Stamps to celebrate the first birthday of Keep It Simple (KIS) Challenge Blog. Be inspired by this fortnights Challenge colours, join in the fun and you could win a fabulous prize from The Alley Way Stamps!
Sunday, November 17, 2013
A Dash of Love, Joy & Hope...
![]() |
| 9 Minutes 17 Seconds later... |
...three things you can never have too much of .
Playing along with Festive Friday Colour Challenge, 10 Minute Craft Dash Buttons Challenges and Dream Valley CAS Challenge. This would almost have to be a record for me from the start of an idea to the to finish of a card too - amazing what one will do to avoid housework LOL! These gorgeous WPlus9 die-cuts and Fancy Pants buttons, together with Swiss Dots embossing folder make for a super fast & fun card :)
10 Minute Dash Tips:
- Die-cuts, die-cuts and more die cuts :)
- Do as many cuts as you can in one pass to save time, I die-cut the three words and one snowflake altogether in the first pass.
- I centred the Swiss Dots on my cardstock before embossing them, then the Swiss Dots creates a natural grid to assist in aligning the die-cuts accurately and quickly.
- I lined up the longest word first (hope), then aligned "joy" above that and "love" above that.
Labels:
Buttons,
Christmas Card,
Craft Dash,
Die Cuts,
Dream Valley,
Festive Friday,
WPlus9
P.S. Congratulations... the sky is the limit!!!
Created this for my DD who sat an exam earlier this year and was recently accepted into a selective girls high school - a very proud Mummy moment!!! We are in the midst of re-decorating her room, and she has decided on a "Vintage French" theme, so my card is a bit more "Vintage" than usual LOL!
Inspired by this weeks Paper Smooches Sparks Designer Drafts (mirror image) and this earlier Paper Smooches Sparks photo inspiration, with the three butterflies as the vertical line.
Cut two sheets of coloured vellum for the Paper Smooches Crystal Clear maison jar. Stamped and die cut Paper Smooches Flap Happy Butterflies with Butterflies 3 die cuts and stamped and fussy cut the Little Lady butterfly, on MME The Sweetest Thing papers. Love this cloud paper from Callege Press too. Cut the sentiment flag using Paper Smooches Flag Tags stamped with Sentiments Sampler. I couldn't resist adding this little message inside, from Paper Smooches Sunny Side Up.
Saturday, November 16, 2013
P.S. Holiday Cheer!
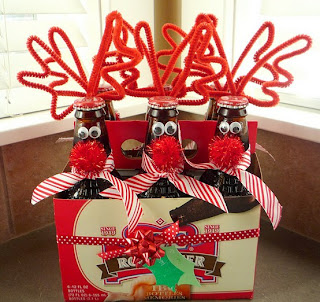
Inspired by this fabulously festive photo from Paper Smooches (below), I decorated a six-pack of beer and used the Paper Smooches Flag Tags dies cut to create a beer bottle tag.
![]() |
| Paper Smooches Sparks Inspiration Photo |
The beer bottle tag was created by cutting a piece of MME pattered paper (cardstock weight) just over two inches wide and just over seven inches long, and scoring and folding it so one side is just over five inches, and the other side is just over two inches long. This paper was placed in the largest Flag Tag die, with the fold just inside the top flat edge of the die, so that when it goes through the die cutter, the folded end remains attached. A one inch hole was then punched in the shorter end of the beer bottle tag and the corners rounded, so this folded flap can be used to hang the tag from the bottleneck. The Paper Smooches Enchanted Elves reindeer was stamped on some old Mambi woodgrain paper, which had been glued to a piece of cardstock for extra strength when fussy cutting. A red Kaisercraft rhinestone was then added for his nose, and a googly eye. The Paper Smooches Christmas Words sentiment was cut from two shades of green papers and the darker green words were set into the negative space left in the lighter green paper, leaving a bit of the background stripes to peek through. The lighter green paper was die cut using the medium sized Flag Tags die, and this was scored and folded and adhered around the beer bottle tag. The reindeer was then pop dotted onto the beer bottle tag. The beer bottle holder was then decorated using Crate Paper - to make it look like a wooden crate of beer LOL! Paper Smooches Ponsettia holly die cuts were used to create the holly, which was pop-dotted over the gingham ribbon.
Playing along with Paper Smooches Sparks DT Call,
Friday, November 15, 2013
WIN a Birthday KIS...
One of my favourite Challenge Blogs, Keep It Simple is turning one today!!! So when Christine invited me to play along as a guest, of course I said YES! To mark the occasion this special celebration is being sponsored by the fabulous The Alley Ways Stamps, so now you have NO excuses not to come along and join the party!!! All you have to do is create a CAS card inspired by this fabulous graphic. I was so inspired I created two cards (and there may even be a third before the challenge is over!)
KIS Inspiration Photo
|
My first card (above) is inspired by the colours and the graphic lines of the inspiration photo, together with the birthday theme. It's a bit difficult to see in my photo, but I have added embossing lines above and below the sentiment. The sentiment is created from The Alley Ways Stamps Chatterbox and Jibber Jabber, with these gorgeous Castaways jelly fish. The background panel was created using Distressed Ink Peacock Feathers, stamped and then embossed, with and the jelly fish being a combination of Distressed Ink Picked Raspberry and Dusty Concord.
As much as I love my first card, I thought it may have been stretching the Keep It Simple philosophy, so I created a second, more CAS card, using The Alley Way Stamps Tag Alongs heart house and arrows. To create the house shaped card I stamped the heart house onto a scrap of paper and photocopied the image at 500% enlargement, cut a cardstock template using the photocopy image as the outline, then cut the card to size. The fabric letters are American Crafts Patchwork Aqua. Inspired by Virginia, I had originally planned on stamping on coloured paint chips (samples from the hardware store) to create the house and arrows but unfortunately my Stazon ink has dried up, and other inks just tended to smudge on the paint chips, so I just used my inks and markers to colour the house and arrows, and the heart stamped on a piece of the leftover colour panel created for my first card.
First card is playing along with Seize the Birthday Texture Challenge, and
Simon Says Stamp Got Ink? Challenge too!
Tuesday, November 12, 2013
Post-it this Christmas...
E.T.A. Curious to find out why this post is getting so many visits again - love it if you could let me know where you have arrived from :)
Had so much fun with this Post-it Note Christmas card for Keep it Simple Sticky Notes Challenge! With two shades of green Post-it Notes in alternate layers, over-stamped the top note with Paper Smooches Winter Groves star then trimmed to shape, the trunk is a gold Post-it Note, over-stamped with Paper Smooches Joyful Greetings sentiment, and three small dots from Winter Groves. Stamped in Momento Luxe - and LOVING it! The best thing about using Post-it Notes is they come pre-glued and if you make a mistake you can easily reposition them!
Playing along with Simon Says Stamp Keep it Clean and Simple Challenge too.
Subscribe to:
Posts (Atom)