Showing posts with label Tags. Show all posts

Thursday, November 8, 2018

FUSION Christmas at Wine O'clock

Inspired by this fortnight FUSION inspiration photo to to recreate a wine bottle gift tag in time for the festive season. The tag was created by cutting a piece of heavy weight MME patterned cardstock just over two inches wide and just over seven inches long, and scoring and folding it so one side is just over five inches, and the other side is just over two inches long. This strip was placed in the largest Paper Smooches Flag Tag die, with the fold just inside the top flat edge of the die, so that when it goes through the die cutter, the folded end remains attached. A one inch hole was then punched in the shorter end of the beer bottle tag and the corners rounded, so this folded flap can be used to hang the tag from the bottleneck. The Paper Smooches Enchanted Elves reindeer was stamped on woodgrain paper, glued to a piece of cardstock for extra strength when fussy cutting. A red Kaisercraft rhinestone and googly eye highlight his red-nosed face. The Paper Smooches Christmas Words sentiment was cut from two shades of green paper, with the darker green words set into the negative space left in the lighter green paper, leaving a bit of the striped tag to peek through, and decorated with a sprig of die cut Paper Smooches Ponsettia holly.

Head on over to the FUSION blog for some more super inspiration from our fabulous Design Team...

Hope you can join in the fun this fortnight @ FUSION.
Can't wait to see what you create!


Sunday, November 30, 2014

All Hearts Come Home for Christmas...

Are you like me and ought to have all your Christmas cards done by next Christmas LOL! There's so much inspiration out there I'm finding it hard to keep up!

I do love the idea of double-tagging on cards, as featured in the current Muse (Caroline) and Tag You're It! (Maureen) challenges. Christmas tag card created using Lawn Fawn papers, Paper Smooches Bookmark die cut, (shortened by die cutting just the fishtail end a second time to remove the excess length), My Favorite Things sentiment embossed in Silver, Prima wood veneer house, heart sequins from the ArtShed and twine from Annabelle's Stamps (now closed).

Playing along with Color ThrowdownMuse and Tag You're It!


Sunday, November 16, 2014

Tag... You're Christmas!

Created an ormament shaker tag for the front of this card. Stamped the navy base layer of the Lawn Fawn tag with Verve Merry and Bright Snowflakes, in Superfine Silver embossing over white ink, then made a sandwich with a foam sheet Lawn Fawn tag (including the Clearly Besotted Signature Christmas ornament shape die cut out of it) added some holographic snowflakes and silver sequins, a clear acetate sheet, then the top layer of Lawn Fawn tag, also with the Clearly Besotted Signature Christmas ornament die cut out, stamped the Verve Merry and Bright sentiment in Superfine Silver embossing over white ink, added the Clearly Besotted Signature Christmas bow die cut in silver glitter paper, then added the whole tag to the navy card front.

Wednesday, November 5, 2014

PS. Tag You're Christmas!

I've been meaning to play along with the fab Tag You're It Challenge for ages, and decided to combine this last minute entry with my Online Holiday Card Class Day 1 Homework (inspired by Debby's gorgeous tag card), Less Is More Colour Challenge - Non-Traditional Christmas, Paper Smooches Sparks Anything Goes, and Addicted to CAS Tags. Created using Paper Smooches Christmas Word dies, Lawn Fawn Tag You're It (although I probably would do the next one in Paper Smooches Stitched Tag) and Lil Inkers Stitched Snowflake. Version two added a border in the same cardstock colour as the sentiment and snowflake.

HINTS for Mass Production:
  • Die cut the tags first, then the "Christmas and "Merry" from the striped tag, then the negative space can be used to line up the coloured letters.
  • Using striped paper makes it easy to align the word dies.
  • If you die cut the white base of the tag from thicker cardstock (or even chipboard), you don't need to worry about pop-dotting the tag.


Saturday, July 19, 2014

Tag You're It Virginia...

A super quick post before I head out to lunch with family and friends, as I'm just squeaking in for the fabulous Virginia's View Die Cut Challenge deadline, and I'll tell you why Laura Bassen is a GENIUS with this Tag You're It Challenge #2 when I return ;) ...

... So did you miss me!!!

I just LOVE the tag Laura Bassen created for the current Tag You're It. It's my favourite colour trio at the moment, however I was running short on time, so I die cut my Paper Smooches tag and Memory Box butterfly from some watercolour paper I had previously coloured using Distress Inks and Glimmermists. I had borrowed the Simon Says Stamp leaves die from Joy when we went away, and had luckily cut the perfect vellum version in my stash. Instead of the gorgeous geometrics Laura chose, I created a white repeating pattern using an Avery Elle "For You" sentiment stamp. In my first attempt I had die cut the butterfly body from the watercolour paper, but the colours just got lost - til I looked back at Laura's tag and realised that with such bright colours, white AND black are needed to make the colours really POP, and so I replaced the butterfly with a black body - and voila - see I told you Laura is a GENIUS!

 
Celebrating with Curtain Call Anything Goes Challenge too!
and a reminder there's still time to join in the fun @ the Mixed Media Card Challenge!

Saturday, November 16, 2013

P.S. Holiday Cheer!


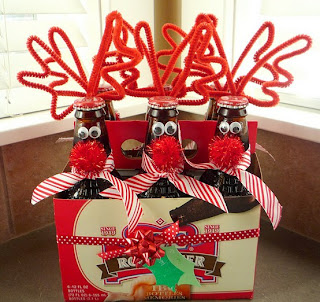
Inspired by this fabulously festive photo from Paper Smooches (below), I decorated a six-pack of beer and used the Paper Smooches Flag Tags dies cut to create a beer bottle tag.
Paper Smooches Sparks Inspiration Photo
The beer bottle tag was created by cutting a piece of MME pattered paper (cardstock weight) just over two inches wide and just over seven inches long, and scoring and folding it so one side is just over five inches, and the other side is just over two inches long. This paper was placed in the largest Flag Tag die, with the fold just inside the top flat edge of the die, so that when it goes through the die cutter, the folded end remains attached. A one inch hole was then punched in the shorter end of the beer bottle tag and the corners rounded, so this folded flap can be used to hang the tag from the bottleneck. The Paper Smooches Enchanted Elves reindeer was stamped on some old Mambi woodgrain paper, which had been glued to a piece of cardstock for extra strength when fussy cutting. A red Kaisercraft rhinestone was then added for his nose, and a googly eye. The Paper Smooches Christmas Words sentiment was cut from two shades of green papers and the darker green words were set into the negative space left in the lighter green paper, leaving a bit of the background stripes to peek through. The lighter green paper was die cut using the medium sized Flag Tags die, and this was scored and folded and adhered around the beer bottle tag.  The reindeer was then pop dotted onto the beer bottle tag. The beer bottle holder was then decorated using Crate Paper - to make it look like a wooden crate of beer LOL!  Paper Smooches Ponsettia holly die cuts were used to create the holly, which was pop-dotted over the gingham ribbon.

Playing along with Paper Smooches Sparks DT Call